Improving MatCaps for hard surfaces
While searching for cheap shading methods I started experimenting with MatCaps ("Material Captures"). These materials only sample a single texture, showing a sphere that is typically shaded by hand in a painting application. The model adopts this shading by sampling the texture per vertex, depending on its normal. As an unlit material, it does not take any light sources into account, making it particularly cheap.

These shaders have become ubiquitous in sculpting applications, as they enable the artist to quickly check her or his work with different material properties in various lighting scenarios. Because the texture lookup solely depends on the normal direction, this shading method favors curvy models like sculpts, where adjacent normals are rarely aligned. Thus every vertex samples a slightly different texture coordinate than its neighbor, which maps the texture onto the model's surface with a lot of detail. However, when this standard method is used on hard-surface models with big flat surfaces whose surrounding vertex normals all point in the same direction, the same texel is sampled throughout the flat area, shading it in one uniform color.


Note the added shading detail on the safe in the modified one.
As I was working on big boxy models, I had to find a solution to give them some texture detail back. Let's look at some shader code from the original method to understand the necessary details, then I'll propose my solution. I was working in Unity's Universal Render Pipeline, so that's what will be shown here. We start with the simplest part, the fragment shader. The only thing it does is sampling the MatCap texture with the passed in UV coordinates:
  real4 frag(Varyings IN) : SV_Target
  {
    return SAMPLE_TEXTURE2D(_MainTex, sampler_MainTex, IN.uv);
  }
Those UV coordinates are calculated in the vertex shader simply by converting the model's vertex normals from object to view space and then projecting them onto the image plane by stripping their z coordinate. Lastly, the remaining coordinates are remapped from [-1, 1] to a [0, 1] range, so that negative values can later be mapped to a texture coordinate as well. Thus, a normal pointing straight at the camera or away from it samples in the texture's center, a normal pointing straight to the left from the camera's view is mapped to the texture's left border, and so on. Because normals are forced to have a length of one before (!) the projection onto the image plane, the UV coordinates never leave the unit circle in the texture.
  Varyings vert(Attributes IN)
  {
    Varyings OUT;
    OUT.positionHCS = TransformObjectToHClip(IN.positionOS);

    real3x3 objectToViewMatrix = (real3x3)
      mul(GetObjectToWorldMatrix(), GetWorldToViewMatrix());

    real3 uvw = IN.normalOS;
    uvw = normalize(mul(objectToViewMatrix, uvw));

    //Remap from [-1, 1] to [0, 1] and project on image plane
    OUT.uv = uvw.xy * .5 + .5;
    return OUT;
  }
Now that we talked about the standard procedure, let's modify it a bit to
better work on boxy shapes. From a potential solution, I demanded 2
properties:
- It still must be darn cheap. The main point of using MatCaps is its low performance cost. That means that we don't have a big budget of instructions to add to the shader.
- All shading information still must come from this one texture. In my opinion, MatCaps are so elegant because they achieve so much with so little. That's how they should stay.
A solution satisfying both demands is constructing the UV coordinates not only
from the normal but from the view direction as well. In view space, this direction
is trivially easy to obtain. Because the camera is at the origin of this space,
the vector pointing to a vertex is the same as its view space position. We
just have to normalize it to not sample outside the unit circle in our
texture. And because we normalize after the blend anyway, we get away with just summing both direction vectors.
Since the matrix-vector product is distributive, we can even
blend position and normal already in object space and then transform only the
blended vector to view space. This leaves the modified shader with one
additional line. I also added a blending factor (_ViewDirBlend) to adjust the influence of the
view direction per material, but hard-coding it to 0.5 gives good results in
most cases.
  Varyings vert(Attributes IN)
  {
    Varyings OUT;
    OUT.positionHCS = TransformObjectToHClip(IN.positionOS);

    real3x3 objectToViewMatrix = (real3x3)
      mul(GetObjectToWorldMatrix(), GetWorldToViewMatrix());

    real3 uvw = IN.normalOS;
    uvw += SafeNormalize(IN.positionOS) * _ViewDirBlend;
    uvw = normalize(mul(objectToViewMatrix, uvw));

    //Remap from [-1, 1] to [0, 1] and project on image plane
    OUT.uv = uvw.xy * .5 + .5;
    return OUT;
  }


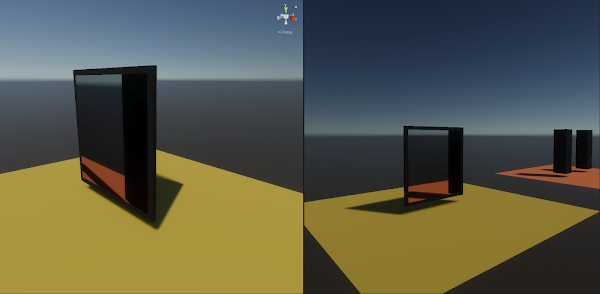
In the picture below you can see the original method on the left and the modified one on the right. The curvy head does not benefit from the modifications. On some MatCaps it loses some contrast, on others you can't really decide which shading method looks better. The boxy safe on the other hand benefits considerably from the modifications. Note the added detail on its sides. When the camera moves in parallel to the image plane, the detail even stays stable, because the projected view direction moves in unison with the object in the frame.

However, the texture projection becomes unstable as soon as the camera rotates. This becomes especially apparent when the object stays fixed in the image center and the camera rotates around it. When the camera is flying around the scene or walking with a character, this effect becomes less apparent though, because the object also moves inside the image frame. Also worth noting is that most MatCaps don't contain high-frequency detail like crevices or speckles. The ones used most often only capture a fine gradient.

Content you saw in the images:
- MatCap textures: github.com/nidorx/matcaps
- Woman's head: threedscans.com/lincoln/womans-head
- Safe: free3d.com/3d-model/safe-58973.html
~David

Comments
Post a Comment